Intro
BoB 9th 공통교육 과정 중, STL(map)을 사용하여 Packet의 Endpoints를 직접 구현해보는 과제가 있었다.
Practice : theory
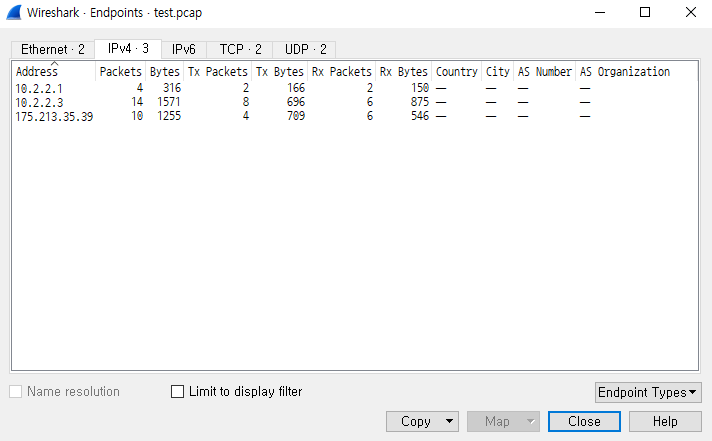
일단 Endpoints를 보면 우리가 필요한 것들을 알 수 있다.
- Address (IPv4)
- 패킷 개수
- 보낸 패킷 수와 바이트
- 받은 패킷 수와 바이트
이렇게 분류상 4가지 정보가 필요하다.
이 정보들을 얻기 위해서는 pcap 파일의 구조 및 ip 구조체에 대한 이해를 해야 한다.
또한 이 구조체들과 데이터들에 대한 처리를 위한 자료구조(STL) 또한 간단하게 알아볼 것이다.
먼저, pcap 파일의 구조이다.
(자세한 설명 : ehclub.co.kr/2548 )
pcap 파일은 pcap 파일 헤더 + 패킷 헤더 + 패킷으로 구성되어 있다.
이 중 우리는 패킷 헤더 부분을 집중해서 볼 것이다.
왜냐하면 패킷 헤더가 주고 받는 패킷의 길이를 저장하기 때문이다.
두번째로, IP 구조체이다.
(자세한 설명 : screwsliding.tistory.com/entry/Pcap-IP헤더-구조체)
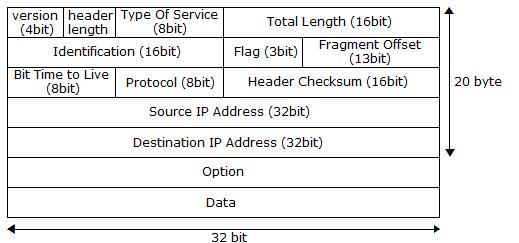
IP 구조체의 정보들은 저렇게 구성되어 있다.
이 중 우리는 20byte에 해당하는 header부분을 사용할 것이다.
헤더에는 버전, 헤더 길이, 출발지와 도착지의 IP, TTL 등 여러 정보가 있다.
자료구조 측면에서는 STL을 사용할 것이다.
STL(Standard Template Library)은 표준 템플릿 라이브러리이다.
(자세한 설명 : ko.wikipedia.org/wiki/표준_템플릿_라이브러리)
STL은 컨테이너를 포함하는데, 컨테이너는 데이터를 저장하는 객체이다. 우리는 이 중 map 컨테이너를 사용할 것이다.
(자세한 설명 : blockdmask.tistory.com/87 -> 난 여기서 참고하여 코드 작성)
Practice : start
이 파트에서는 위 이론들을 코드로 보며 이해할 것이다.
먼저, 패킷 헤더이다.
struct pcap_pkthdr
{
             structtimeval ts;    /*time stamp */
             bpf_u_int32 caplen; /* length of portionpresent */
             bpf_u_int32 len;     /* length thispacket (off wire) */
};
위 코드가 pcap의 패킷 헤더 구조체다.
각 패킷은 타임스탬프, 패킷 캡쳐 길이, 패킷 길이 정보를 헤더에 저장한다.
(여기서 패킷 캡쳐 길이를 따로 설정하지 않는다면 caplen과 len은 같다.)
여기서 우리는 len을 사용하여 송수신 패킷의 길이를 저장할 것이다.
다음은 IP 구조체이다.
struct  ip
{
#if __BYTE_ORDER == __LITTLE_ENDIAN
       unsigned int ip_hl:4;        /* header length */
       unsigned int ip_v:4;         /* version */
#endif
#if __BYTE_ORDER == __BIG_ENDIAN
       unsigned int ip_v:4;         /* version */
       unsigned int ip_hl:4;        /* header length */
#endif
       u_int8_t ip_tos;        /*type of service */
       u_short ip_len;        /* total length */
       u_short ip_id;         /* identification */
       u_short ip_off;        /* fragment offset field */
#define IP_RF               0x8000        /* reserved fragment flag */
#define IP_DF               0x4000        /* dont fragment flag */
#define IP_MF              0x2000        /* more fragment flag */
#define IP_OFFMASK    0x1fff          /* mask for fragmenting bits */
       u_int8_t ip_ttl;        /* time to live */
       u_int8_t ip_p;        /* checksum */
       struct in_addr ip_src, ip_dst;        /* source and dest address */
};
IP 헤더 구조체의 코드는 위와 같다.
현재 우리는 여기서 송수신 패킷의 주소를 사용할 것이다.
이를 위해 struct in_addr ip,src, ip_dst 를 사용하여 코드를 구현할 것이다.
Practice : code/command
내 코드 : github.com/js0807/packet-stat
(내가 참고한 코드에 대한 Reference를 적어두겠다.)
(Reference : https://github.com/ExploitSori/packet-stat/blob/main/main.cpp.)
Entire Code
// how to build
// g++ packet-stat.cpp -o packet-stat -lpcap
// I referenced https://github.com/ExploitSori/packet-stat/blob/main/main.cpp.

#include <iostream>
#include <pcap.h>
#include <netinet/ip.h>
#include <arpa/inet.h>
#include <map>

using namespace std;

typedef struct s{
    int sendCnt;
    int sendBytes;

    int recvCnt;
    int recvBytes;
}s;

int main(int argc, char* argv[]){
    pcap_t *packet;
    char errbuf[PCAP_ERRBUF_SIZE];
    struct pcap_pkthdr *header;
    const u_char *data;
    map<string,s*> m;

    if(argc!=2){
        cout<<"usage : "<<argv[0]<<" test.pcap\n";
    } else{
        packet = pcap_open_offline(argv[1],errbuf);
        while(int returnValue = pcap_next_ex(packet,&header,&data)>=0){
            struct ip *ipv4;
            ipv4=(struct ip*)(data+14);
            string src(inet_ntoa(ipv4->ip_src));
            string dst(inet_ntoa(ipv4->ip_dst));

            if(m.find(src)==m.end()){
                s* tmp_send = (s*)malloc(sizeof(s));
                tmp_send->sendCnt=1;
                tmp_send->sendBytes=header->len;

                tmp_send->recvCnt=0;
                tmp_send->recvBytes=0;
                m.insert(pair<string,s*>(src,tmp_send));
            } else{
                m[src]->sendCnt+=1;
                m[src]->sendBytes+=header->len;
            }

            if(m.find(dst)==m.end()){
                s* tmp_recv = (s*)malloc(sizeof(s));
                tmp_recv->sendCnt=0;
                tmp_recv->sendBytes=0;

                tmp_recv->recvCnt=1;
                tmp_recv->recvBytes=header->len;
                m.insert(pair<string,s*>(dst,tmp_recv));
            } else{
                m[dst]->recvCnt+=1;
                m[dst]->recvBytes+=header->len;
            }
        }

        cout<<"IP\t\t|"<<"Send Packet\t|"<<"Send Bytes\t|"<<"Recv Packet\t|"<<"Recv Bytes\t|\n";
        for(auto &i : m){
            cout<<i.first<<"\t|"<<i.second->sendCnt<<"\t\t|"<<i.second->sendBytes<<"\t\t|"<<i.second->recvCnt<<"\t\t|"<<i.second->recvBytes<<"\t\t|\n";
        }

        pcap_close(packet);
    }

    return 0;
}
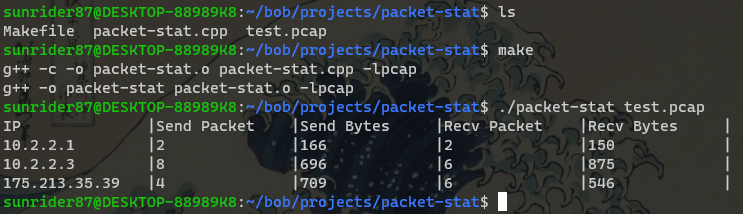
Run Command
make
./packet-stat test.pcap
Practice : code review
여기서는 내 코드를 리뷰할 것이다.
먼저, Include 부이다.
#include <iostream>
#include <pcap.h>
#include <netinet/ip.h>
#include <arpa/inet.h>
#include <map>

using namespace std;
위 include의 사용 용도는 이렇다.
- c++ 사용 : iostream
- 패킷 헤더 사용 : pcap.h
- IP 헤더 구조체 사용 : netinet/ip.h
- IP를 string으로 변환 : arpa/inet.h
- STL의 map 컨테이너 : map
다음으로는 endpoint에 들어가는 정보들을 효율적으로 관리하기 위해 구조체를 선언했다.
typedef struct s{
    int sendCnt;
    int sendBytes;

    int recvCnt;
    int recvBytes;
}s;
이 구조체는 송신 패킷의 개수와 바이트, 수신 패킷의 개수와 바이트 이렇게 구성되어 있다.
이제 이를 이용해보자.
pcap_t *packet;
char errbuf[PCAP_ERRBUF_SIZE];
struct pcap_pkthdr *header;
const u_char *data;
map<string,s*> m;
먼저 패킷 변수와 에러가 났을 때 에러 메시지를 담는 errbuf를 선언한다.
그 후 패킷 헤더 구조체, 패킷의 데이터를 담는 데이터 변수와
string과 s(송수신 패킷 관련 구조체) 구조체를 타입으로 가지는 map 컨테이너를 선언한다.
if(argc!=2){
        cout<<"usage : "<<argv[0]<<" test.pcap\n";
} else{
    ...
    ...
    ...
}
먼저, 이 코드의 사용법을 정의했다.
만약에 사용법대로 하지 않을 경우 사용법을 출력하고 종료된다.
packet = pcap_open_offline(argv[1],errbuf);
    while(int returnValue = pcap_next_ex(packet,&header,&data)>=0){
    	...
        ...
        ...
    }
pcap_close(packet);
else문 안에는 이렇게 되어 있다.
우리는 이미 저장되어 있는 pcap 파일을 통해 endpoints 분석을 하므로, pcap_open_offline() 함수를 사용했다.
(자세한 설명 : linux.die.net/man/3/pcap_open_offline)
이후, 그 패킷을 반복문을 돌면서 pcap_next_ex() 함수를 사용해 남은 패킷 개수를 체크하며 while문 안에서 패킷 처리를 진행한다.
struct ip *ipv4;
ipv4=(struct ip*)(data+14);
string src(inet_ntoa(ipv4->ip_src));
string dst(inet_ntoa(ipv4->ip_dst));

if(m.find(src)==m.end()){
  s* tmp_send = (s*)malloc(sizeof(s));
  tmp_send->sendCnt=1;
  tmp_send->sendBytes=header->len;

  tmp_send->recvCnt=0;
  tmp_send->recvBytes=0;
  m.insert(pair<string,s*>(src,tmp_send));
} else{
  m[src]->sendCnt+=1;
  m[src]->sendBytes+=header->len;
}

if(m.find(dst)==m.end()){
  s* tmp_recv = (s*)malloc(sizeof(s));
  tmp_recv->sendCnt=0;
  tmp_recv->sendBytes=0;

  tmp_recv->recvCnt=1;
  tmp_recv->recvBytes=header->len;
  m.insert(pair<string,s*>(dst,tmp_recv));
} else{
  m[dst]->recvCnt+=1;
  m[dst]->recvBytes+=header->len;
}
while문 안에는 이렇게 되어 있다.
먼저, ip 구조체를 선언하고, 패킷 헤더 부분 말고 데이터 부분을 ipv4 구조체 형식으로 형변환 후 넘겨준다.
다음은 ip를 inet_ntoa()를 사용하여 string 형식으로 변환한 후 저장한다.
다음은 가장 중요한 패킷 처리 부분이다.
if(m.find(src)==m.end()){
	s* tmp_send = (s*)malloc(sizeof(s));
	tmp_send->sendCnt=1;
	tmp_send->sendBytes=header->len;

	tmp_send->recvCnt=0;
	tmp_send->recvBytes=0;
	m.insert(pair<string,s*>(src,tmp_send));
} else{
	m[src]->sendCnt+=1;
	m[src]->sendBytes+=header->len;
}
먼저, 송신부이다. 수신부도 이와 같은 로직을 사용한다.
s 구조체를 사용하기 위해 malloc으로 메모리를 할당하고,map에서 src ip를 가진 것을 찾는다.
만약 찾는 것이 없을 시에는 m.end()와 같은 값을 가진다.
따라서 if문에서는 처음 상황을 초기화하는 역할을 한다.
현 상황이 수신 상황에서의 패킷 처리를 해야 되므로
temp로 만들어진 s 구조체에 sendCnt=1로 초기화, sendBytes=header(패킷 헤더)->len 을 넣는다.
그리고 수신 부분의 변수들은 다 0으로 초기화한다.
그 후에 m(맵)에 src와 현재 초기화 하기 위해 만든 임시 s 구조체를 insert한다.
그렇게 되면 else 문에서는 위 초기화 과정을 거치지 않아도 처리 가능하다.
else문에서는 이미 기존에 있는 src에 해당하여 sendCnt를 1 올리고, sendBytes=header->len을 처리한다.
수신부에서는 저것과 반대로 송신 부분 변수를 0으로 하고 recvCnt와 recvBytes에 값을 넣는다.
cout<<"IP\t\t|"<<"Send Packet\t|"<<"Send Bytes\t|"<<"Recv Packet\t|"<<"Recv Bytes\t|\n";
for(auto &i : m){
	cout<<i.first<<"\t|"<<i.second->sendCnt<<"\t\t|"<<i.second->sendBytes<<"\t\t|"<<i.second->recvCnt<<"\t\t|"<<i.second->recvBytes<<"\t\t|\n";
}
이후 출력한다.
여기서 for(auto &i : m)은 기존에 보던 for문과 다를 것이다.
이 for문은 그 python에서 list를 활용한 for문과 같은 for문을 사용할 수 있도록 c++에서 지원되었다.
따라서 이제 각각의 값들을 출력시키고 packet_close()를 거치면 프로그램은 끝이 난다.
보면 이렇게 패킷의 Endpoint 작성을 구현한 것을 볼 수 있다.
Conclusion
나는 원래 한번도 구조체를 사용해서 프로그램을 작성해 본 적이 없었다.
그래서 어떻게 어떻게 해서 pcap_open_offline()을 통해 while문으로 패킷을 하나하나 넘기며 출력은 할 수 있었다.
하지만 이 과제는 모두 구조체를 사용해서 프로그래밍을 진행해야 했기에, 좀 큰 어려움이 있었다.
그래서 과제 당일까지 IP 구조체만을 보고만 있어야 했었다.
그래서 결국에는 Reference를 보고 말았다.
( 이분꺼 : https://github.com/ExploitSori/packet-stat/blob/main/main.cpp. )
확실히 봤는데 너무 코딩을 잘하셨다. 그리고 코드를 보니 구조체는 이렇게 사용하는구나를 알게 되었다.
특히 -> 이 화살표를 사용해서 값을 빼내오고, malloc() 등 여러가지 한번도 사용하지 못한 것들을 배웠다.
그리고 이 코드를 내 손으로 약간 변형하면서 만들어 봤는데, 확실히 보는것보단 치는게 더 이해가 잘 된다.
코드를 거의 보고 변수만 다르게 한 수준이기 때문에, 혹시 문제가 되면 삭제할 예정입니다. 감사합니다.
※ BoB 9기 공통교육 중 내용이므로 Study 목적 외에는 사용 금지 부탁드리겠습니다.